All Weapons in Doom: The Dark Ages
Get ready to rip and tear… medieval-style. In Doom: The Dark Ages, the Slayer trades sci-fi tech for steel and hellfire, wielding an arsenal that’s as brutal as it is brilliant. From classic shotguns to god-slaying flails and demon-splitting gauntlets, every weapon packs a punch—and each one has its moment to shine.
This guide is your companion to every weapon in the game. We’ll cover how to get them, what they do, and how to upgrade them for maximum carnage. Whether you’re bashing skulls with the Dreadmace or lighting up hellspawn with Atlan’s heavy artillery, mastering your arsenal is the key to surviving the legions of Hell.
Doom: The Dark Ages Weapons Overview
In this prequel to Doom Eternal, the Slayer’s arsenal is a brutal blend of ranged firepower, crushing melee tools, and shield-based combat. Every weapon has a role, some shred through hordes, others specialize in staggering tougher enemies. You’ll even unlock special weapons exclusive to Atlan, the demon-slaying mecha you pilot in key missions.
Weapons are acquired through campaign progression, typically delivered in dramatic style via orbital drop pods. When they crash down, you know it’s time to upgrade your slaying potential.
Combat Shotgun (chapter 1)
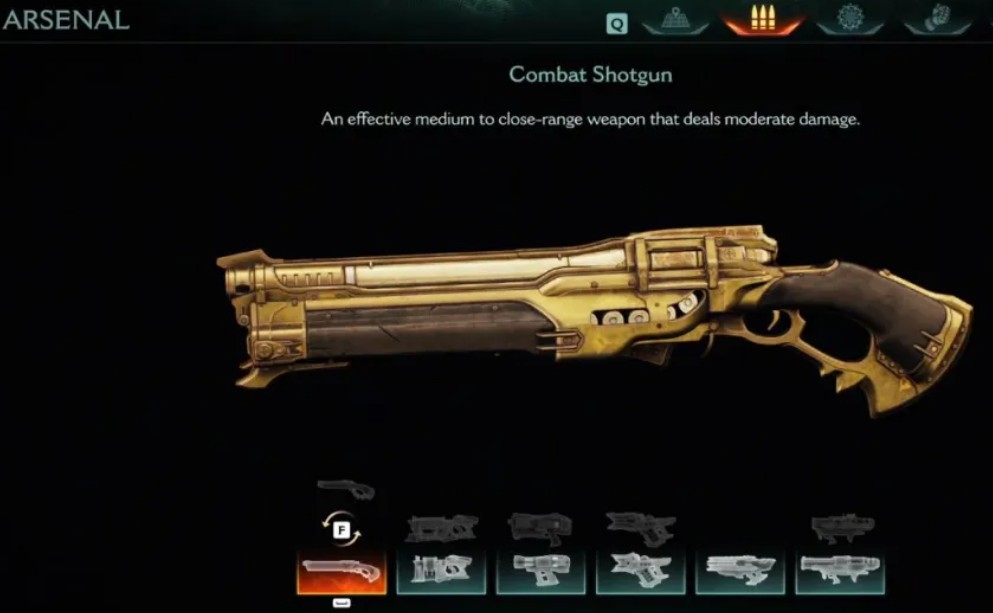
At the start of the game, you start with the Combat Shotgun (how could it not). It carries 20 bullets by default. As always, it is great for close-range combat. Upgrading the Combat Shotgun is well worth it, as it remains a great choice for quite a lot of fights throughout the game.
Key Features:
- Effective Range: Close
- Ammo Capacity: 20 shells
- Primary Use: Ideal for eliminating weaker demons and finishing off stronger foes at close quarters.
Upgrades
- Incendiary: Shots ignite enemies, causing them to drop armor shards upon death. These provide a steady source of armor, increasing the survival rate during combat.
- Further Enhancements: Further upgrades boost damage and firing rate, enhancing the shotgun’s effectiveness against tougher enemies.
Power Gauntlet (chapter 1)
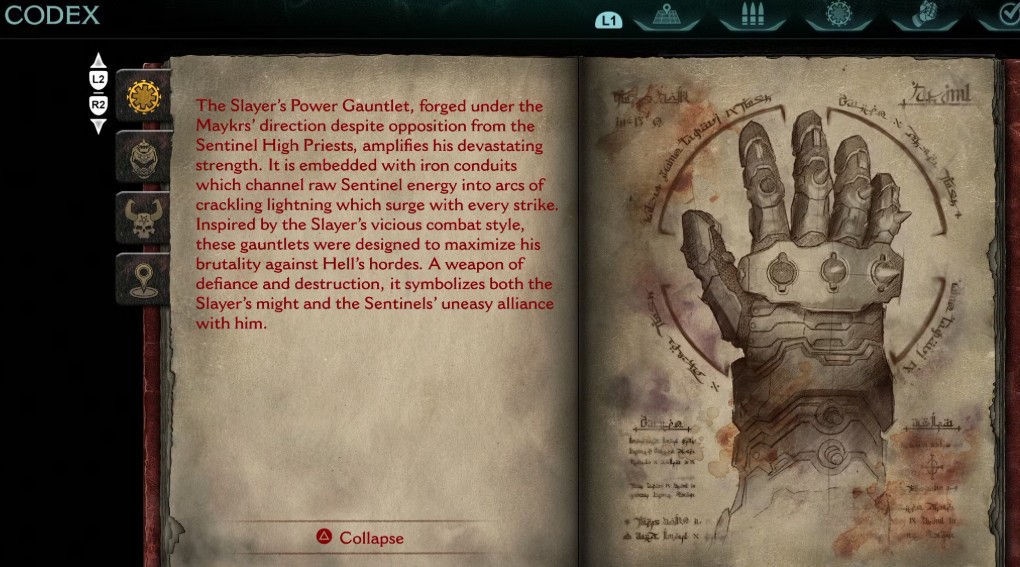
In Doom: The Dark Ages, the Power Gauntlet is a melee weapon that improves the Doom Slayer’s effectiveness in close-quarters combat. Designed for delivering increasing damage through combo attacks, it serves as a useful tool against demonic adversaries.
The Power Gauntlet is obtained during Chapter 1: Village of Khalim, as part of the “Cover the Escape!” objective. Progressing through the storyline will naturally lead to its acquisition.
Key Features:
- Combo Attacks: The Gauntlet is capable of performing a three-hit combo that includes two punches followed by a forward kick, with the damage increasing with each consecutive strike.
- Charge System: Stores up to three charges; each attack uses one. Charges regenerate over time and faster by parrying Hell Surge attacks with the Shield Saw.
- Ammo Generation: Hitting enemies makes them drop extra ammo, helping with resource management.
Upgrades:
- Finisher: Increases the damage of the final hit in the Gauntlet’s combo.
- Duelist: Parrying Hell Surge attacks accelerates melee charge regeneration.
- Jolt: The first hit of the combo applies a Shock effect, making demons take increased damage from subsequent attacks.
- Encore: Adds a fourth hit to the combo, accessible when acquiring a melee charge from a parried attack.
Shredder (Chapter 1)
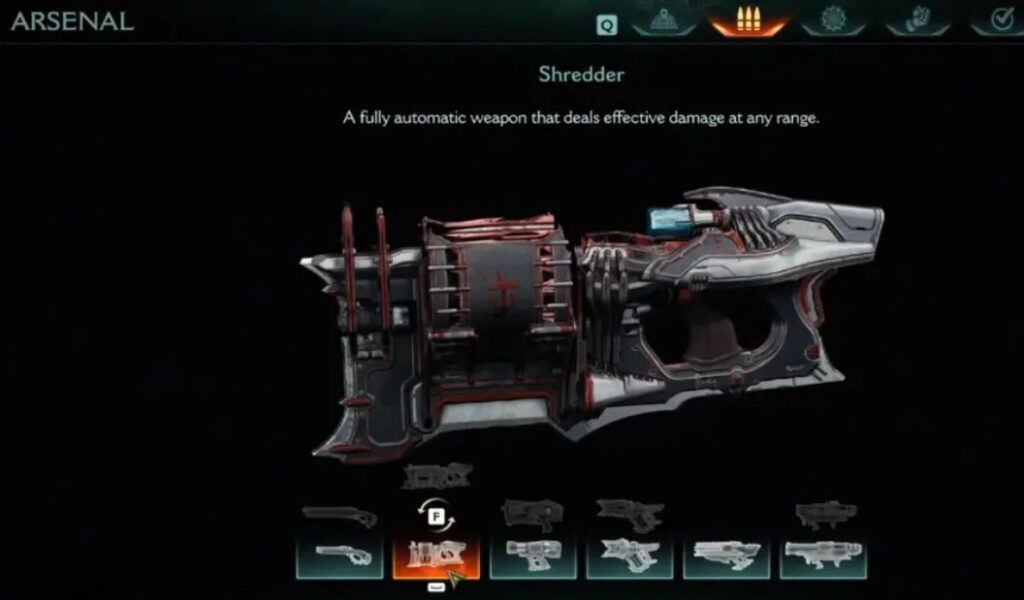
The Shredder is a fully automatic weapon that fires spike-shaped projectiles, making it effective for sustained damage. The Shredder is obtained during Chapter 1: Village of Khalim, specifically while undertaking the “Cover the Escape” mission to destroy four demon portals.
Key Features:
- Fire Rate: High
- Ammo Capacity: 120 rounds
- Primary Use: Great for groups because of its rapid fire, but individual shots are weaker than those from the Combat Shotgun.
Upgrades:
- Pincushion: Dealing sufficient damage to a demon applies the Pincushion status. Hitting the demon with a Shield Throw or parrying a Hell Surge attack detonates Pincushion, causing area damage.
- Ricochet: Shredder projectiles that hit a demon affected by the Shield Saw will ricochet to strike an additional demon.
- No Frills: Increases the Shredder’s rate of fire.
- Barbed: Detonated and ricocheted Shredder projectiles deal increased damage. Additionally, hitting a demon with Shield Charge now detonates Pincushion, causing more area damage
Shield Saw (Chapter 2)

The Shield Saw is a long-range, single-shot weapon ideal for eliminating groups of weak enemies and destroying superheated metal shields. It can also stun larger demons, providing an opportunity to use other powerful weapons.
Although the shield functions as a weapon from the outset in Doom: The Dark Ages, its full potential is only realized when the Shield Saw is obtained at the beginning of Chapter 2, “Hebeth”.
Key Features:
- Blocking and Parrying: The Shield Saw blocks and parries attacks, including Hell Surge projectiles. Successful parries can stagger enemies, allowing for counterattacks.
- Throwable Weapon: It stuns enemies, destroys metal shields and armor, then returns to the Slayer, damaging foes along its path.
- Grappling Mechanism: The Shield Saw lets the Slayer latch onto grapple points for navigation.
Upgrades:
- Retaliation: Parrying a Hell Surge triggers a large shockwave, causing nearby demons to falter.
- Power Surge: Throwing the shield at an enemy’s energy shield causes it to bounce to nearby enemies, dealing damage.
- Extended Range: Increases the distance the Shield Saw can be thrown, allowing for greater reach.
- Steadfast: Reduces recovery time after the shield takes damage or breaks, enabling quicker reuse.
- Harvester: Killing multiple fodder demons with a Shield Throw empowers the next Shield Charge, increasing its damage.
- Blade Master: Extends the stun duration on non-fodder enemies hit by the Shield Saw.
Doom: The Dark Ages Accelerator (Chapter 2)
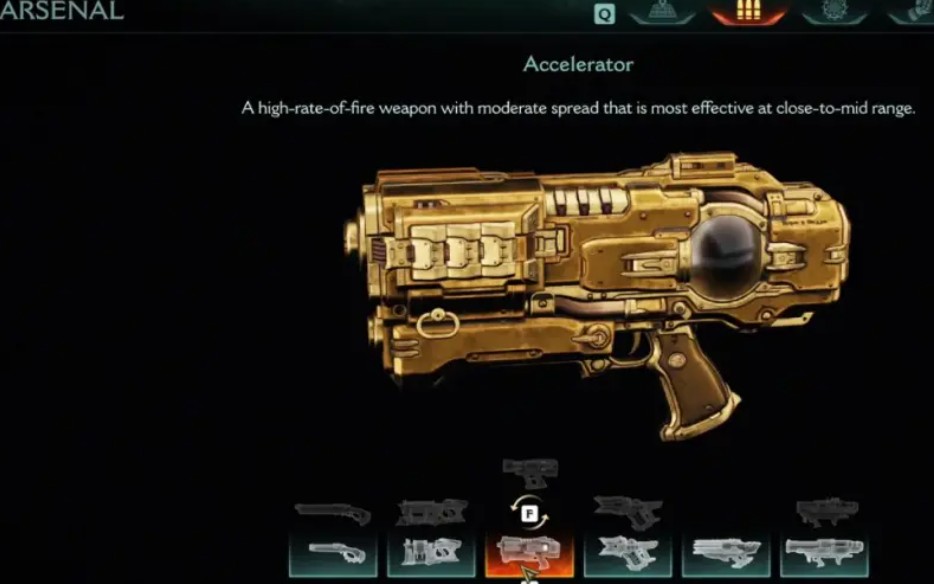
The Accelerator becomes available in Chapter 2, “Hebeth.” You find it during the “Defend Hebeth” mission while seeking the source of demonic corruption (specifically in the Research Lab). It looks futuristic and is a powerful weapon in Doom: The Dark Ages.
The Accelerator’s rapid-fire is great for Crowd Control. It can easily manage groups of weaker demons effectively. Building and maintaining charge enhances damage output; releasing at maximum charge with Heatblast can clear clusters of enemies.
Key Features:
- Fire Rate: High
- Accuracy: Moderate; effectiveness increases with sustained fire
- Primary Use: Effective against groups of enemies due to its rapid-fire capability
Upgrades:
- Feedback: Shooting demons builds charge; at maximum charge, the Accelerator’s damage is increased.
- Stabilizer: At maximum charge, the weapon’s spread is reduced, enhancing accuracy.
- Modulator: Increases the Accelerator’s rate of fire at maximum charge.
- Heatblast: Releasing at maximum charge fires a damaging blast that consumes all remaining charge; demons killed by Heatblast drop ammo.
- Mega Cell: Increases the time it takes for the Accelerator to lose charge.
- Overload: Deals extra damage when targeting the same enemy.
Doom Atlan’s Machine Gun (Chapter 3)
The Atlan’s Machine Gun is an advanced weapon system integrated into the Atlan mech, engineered to provide rapid and effective firepower against significant demonic threats. This weapon system becomes accessible in Chapter 3: Barrier Core, where players operate the Atlan mech to engage with huge demonic entities.
Utilize dodges to supercharge the machine gun, this maximizes damage during combat. You need to focus fire on larger demons to capitalize on the weapon’s high damage potential.
Key Features:
- High Fire Rate: Capable of unleashing a continuous stream of bullets, making it effective against formidable foes.
- Charge Mechanism: Executing perfect dodges with the Atlan mech temporarily enhances the machine gun’s damage output, indicated by the barrels glowing red.
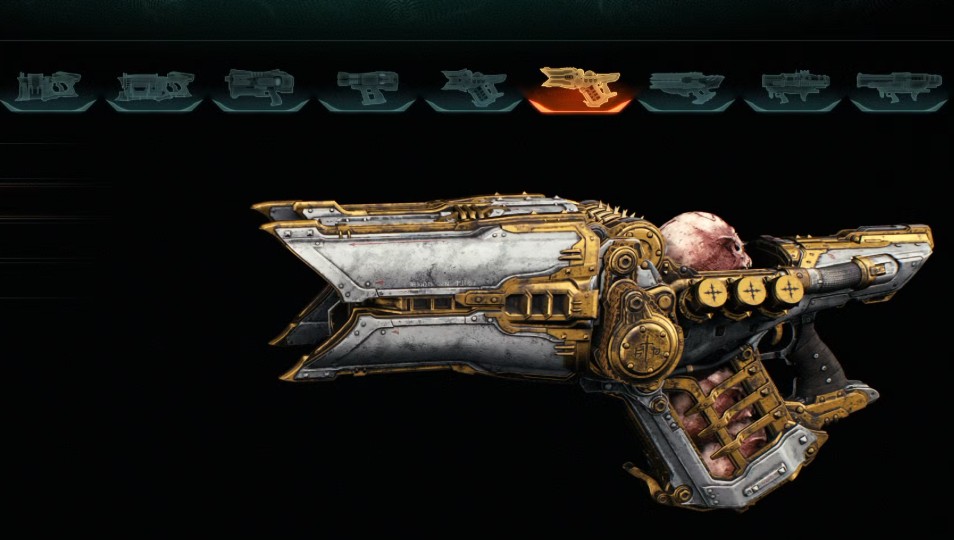
Pulverizer (Chapter 4)

In Doom: The Dark Ages, the Pulverizer stands out as a distinctive and formidable weapon. It utilizes demonic skulls as ammunition to unleash high-damage attacks. The Pulverizer is obtained in Chapter 4: Sentinel Barracks. As you progress through the “Defend the Barracks” objective, you’ll encounter the weapon early in the chapter. The pulverizer is great for clearing waves of demons.
Key Features:
- Ammunition Mechanism: The Pulverizer crushes demonic skulls to fire bone shards in a wide arc, making it highly effective for crowd control.
- Fire Rate: Rapid, allowing for quick dispersion of projectiles over a broad area.
Upgrades:
- Runic Skull: Killing demons with the Pulverizer or melee attacks builds charge based on the demon’s size. At maximum charge, your movement speed and the Pulverizer’s rate of fire are increased.
- Runic Strike: Melee strikes contribute to building and maintaining the weapon’s charge.
- Flay: Increases the number of projectiles per shot and widens the spread, enhancing effectiveness against groups of enemies.
Impaler (Chapter 4)
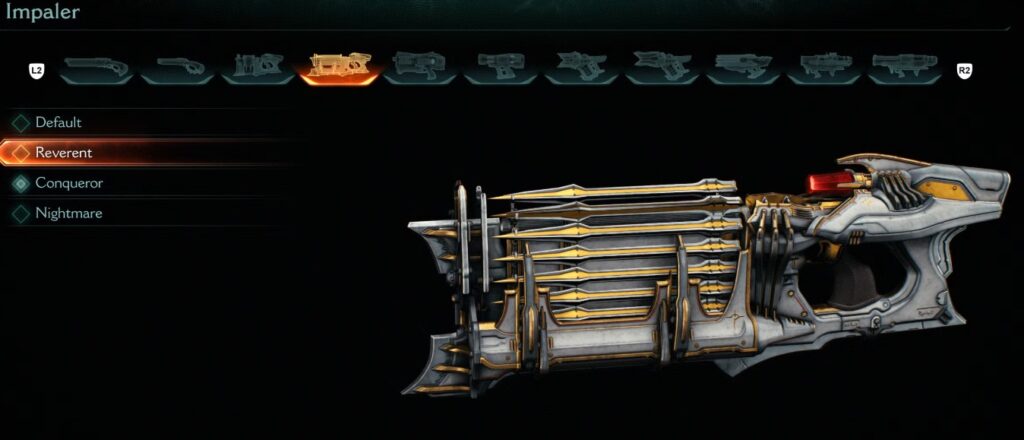
The Impaler is a precision rail spike weapon designed for high-damage, long-range attacks. It allows the Doom Slayer to eliminate enemies accurately, making it effective against strong foes. It deals quite a lot of damage but unfortunately, the Impaler is low on ammo. You find it in Chapter 4: Sentinel Barracks, near the entrance to the Dragons Den.
Key Features:
- High Damage Output: The Impaler delivers significant damage per shot, capable of eliminating many demons with a single well-placed hit.
- Precision Targeting: Ideal for headshots, the weapon excels in targeting specific weak points on enemies.
- Limited Ammo Capacity: Due to its power, the Impaler has a relatively low ammunition count, requiring judicious use during combat.
Upgrades:
- Stalwart: Hitting a demon with Shield Throw, Shield Charge, or parrying a Hell Surge attack drops Impaler ammo.
- Salvage: Picking up Impaler ammo empowers your next shot, increasing its damage output.
- Chronospike: Holding the fire button slows down time; shots fired during this period deal increased damage.
- Lobotomy: Headshots with the Impaler refill a portion of your melee charge, promoting a synergy between ranged precision and close-quarters combat.
Cycler (Chapter 5)
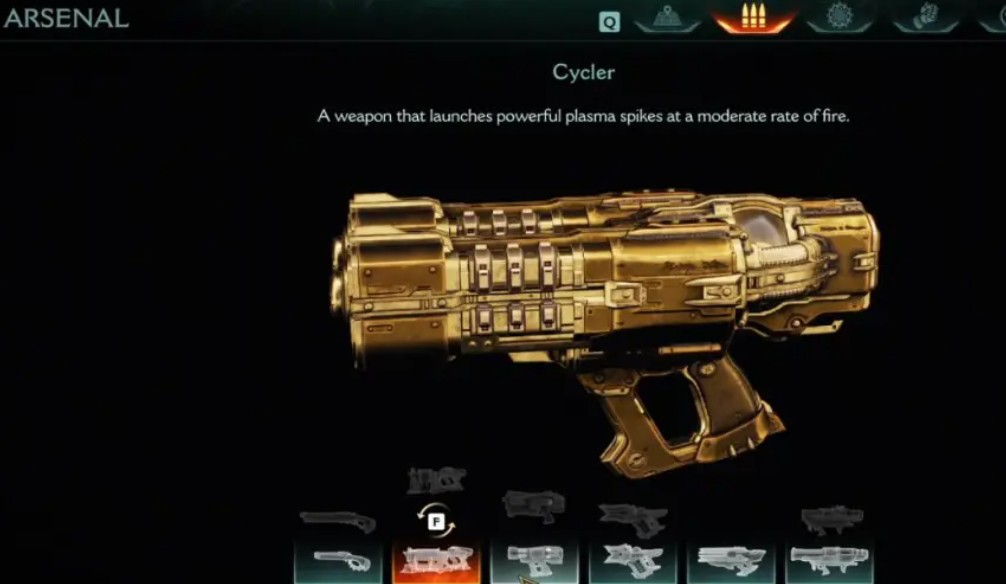
The Cycler is the second Plasma weapon available. It shares a slot with the Accelerator. You can find it in Chapter 5 “The Holy City of Aratum” on one of the ships you need to destroy at the start of the level.
Similar to the Accelerator, the Cycler is effective against shielded enemies and can penetrate Energy Shields. This weapon has an upgrade that inflicts Shock on enemies, a debuff that increases the damage they receive.
Key Features:
- Dual-Barrel Design: The Cycler features two barrels that fire in alternating fashion, delivering a continuous stream of plasma bolts.
- Chain Lightning Effect: With the appropriate upgrades, the Cycler can apply a ‘Shock’ status to demons, causing lightning to arc between multiple targets upon their defeat.
Upgrades:
- Shock: Dealing sufficient damage to a demon applies the ‘Shock’ status, making them take increased damage from player attacks. Killing a shocked demon causes lightning to arc to nearby demons.
- Amplify: Increases the damage dealt to shocked demons.
- Fulmination: Extends the duration of the ‘Shock’ status. Additionally, killing a shocked demon generates more lightning arcs.
- Overload: Killing a demon builds charge based on the demon’s size. At maximum charge, the Cycler deals increased damage.
Super Shotgun (Chapter 5)
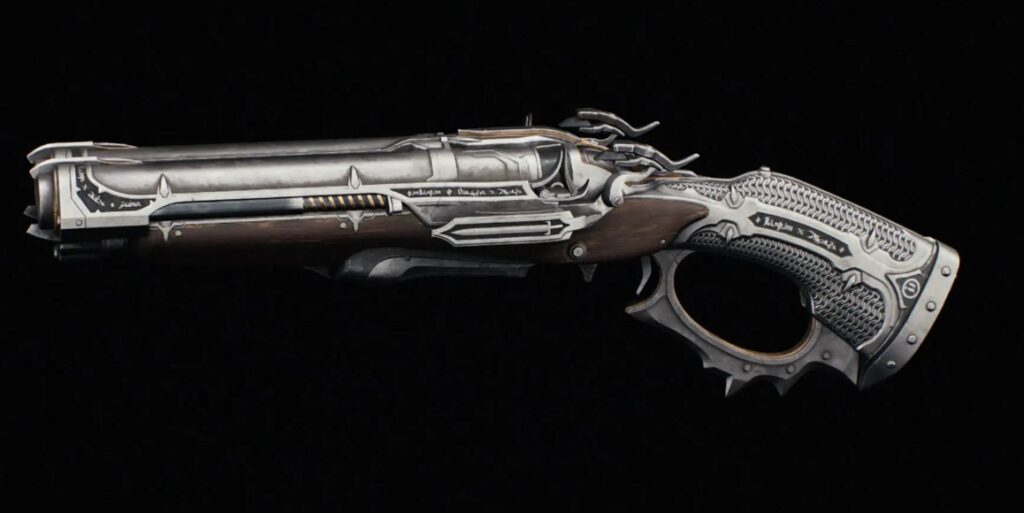
In Doom: The Dark Ages, the Super Shotgun is a close-range weapon known for its significant damage output due to its dual-barrel design. This version includes a lever-action mechanism, which enables the Doom Slayer to operate and reload it with one hand. The reload is very slow, but the close-range damage I extremely high. The Super Shotgun is obtained during Chapter 5: The Holy City of Aratum, following the first encounter with Enforcers.
Key Features:
- Lever-Action Reload: This design enables one-handed operation and reloading, enhancing combat fluidity.
- High Damage Output: The Super Shotgun excels in delivering substantial damage at close range, making it effective against formidable adversaries.
Upgrades:
- Speed Loader: Reduces the time between shots, allowing for quicker successive firing.
- Shatter: Increases damage dealt to armored enemies, making it more effective against heavily shielded foes.
- Eat This!: Increases the number of projectiles fired per shot, enhancing overall damage output.
Flail (Chapter 6)
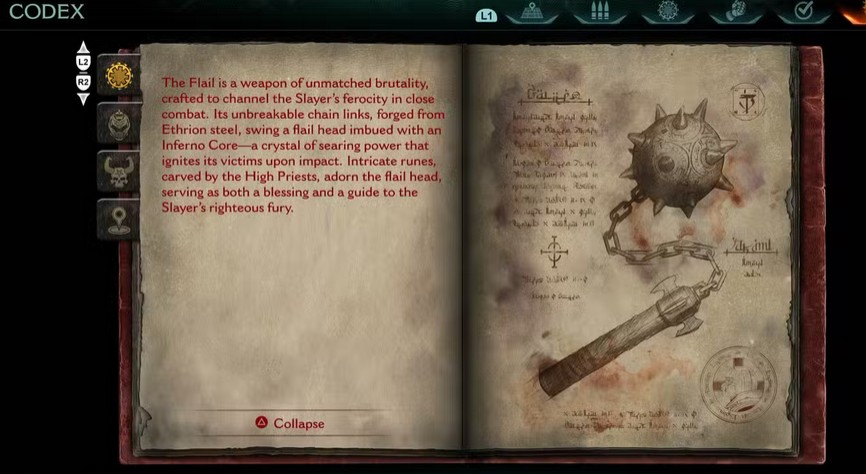
The Flail is a powerful melee weapon. It has extended reach and significant impact, making it highly effective against armored and shielded adversaries. To obtain it, play the beginning of Chapter 6 “Siege – Part 1.” You’ll find its pod in front of a massive gate separating you from a demon army.
The flail recharges melee stacks at a slower rate than other weapons, requiring strategic use to maximize its effectiveness.
Key Features:
- Extended Reach: The Flail’s chain allows the Doom Slayer to strike enemies from a distance, providing a tactical advantage over foes wielding melee weapons.
- Armor Penetration: The Flail excels at breaking through metal shields and armored foes where other weapons fail.
- Area Damage: Upon impact, the Flail releases a damaging blast affecting nearby enemies, making it useful for crowd control.
Upgrades:
- Conditioning: Reduces the cooldown of each Flail charge by five seconds, allowing for more frequent use.
- Ignite: Demons hit by the Flail are scorched and drop armor, increasing survivability during combat.
- Resonant: Flail strikes deal additional damage to metal shields and armor, and these strikes generate armor shards.
- Engulf: Every Flail strike also scorches nearby demons, causing them to drop armor, enhancing its effectiveness against groups.
Doom: The Dark Ages Chainshot (Chapter 6)
The Reaver Chainshot is a distinctive weapon that combines elements of ranged and melee combat. It launches a dense, spherical projectile known as the Chaos Sphere, tethered to the weapon by a chain, allowing it to strike enemies and then retract.
The Reaver Chainshot is obtained during Chapter 6: Siege – Part I. You have to solve a puzzle during the mission to destroy the Gore Portals. You can’t miss obtaining the Chainshot.
Key Features:
- Charge Mechanic: Holding down the trigger charges the Chaos Sphere, increasing its damage and range upon release.
- Retractable Projectile: After being fired, the Chaos Sphere returns to the weapon, allowing for continuous use without the need for manual retrieval.
Upgrades:
- Eldritch Blessing: Parrying a Hell Surge attack instantly charges your next shot.
- Gravitational Flux: Fully charged shots deal increased damage to armored targets.
- Cosmic Breach: Fully charged projectiles explode upon hitting a demon, dealing area damage.
Grenade Launcher (Chapter 8)
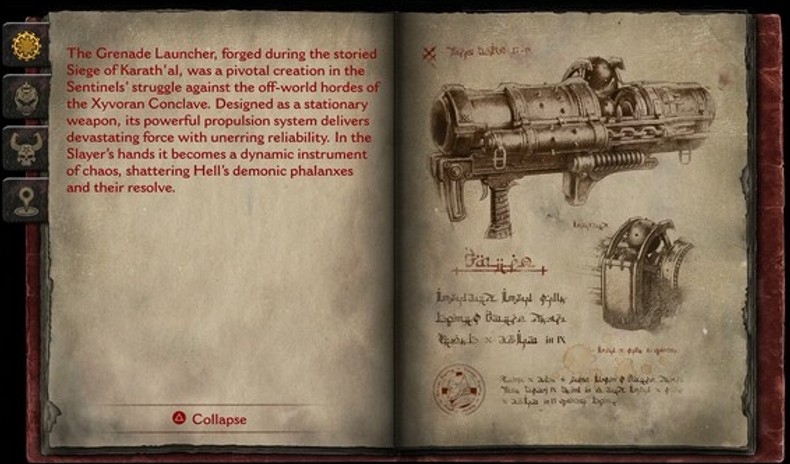
The Grenade Launcher, found in Chapter 8: Abyssal Forest, is a weapon for area damage against groups of demons. It fires bouncing explosive projectiles that detonate on impact, useful for hitting enemies behind cover. This weapon is a blast to use. It is very satisfying to blow up groups of demons. Against single targets, the grenade launcher is still an okay option, but you probably want to use something else.
Key Features:
- Arcing Projectiles: The grenades follow a curved trajectory, allowing you to hit enemies behind obstacles or in elevated positions.
- Surface Bouncing: Projectiles can ricochet off walls and floors, enabling strategic shots around corners or into confined spaces.
- Area Damage: The explosions deal damage over a radius, making it effective for crowd control.
Upgrades:
- Fragment: Every third direct hit with the Grenade Launcher drops Cluster Grenades that deal area damage.
- Rupture: Direct hits with the Grenade Launcher drop Cluster Grenades when hitting a demon affected by the Shield Saw.
- Cataclysm: Every second direct hit with the Grenade Launcher drops Cluster Grenades.
Rocket Launcher (Chapter 10)
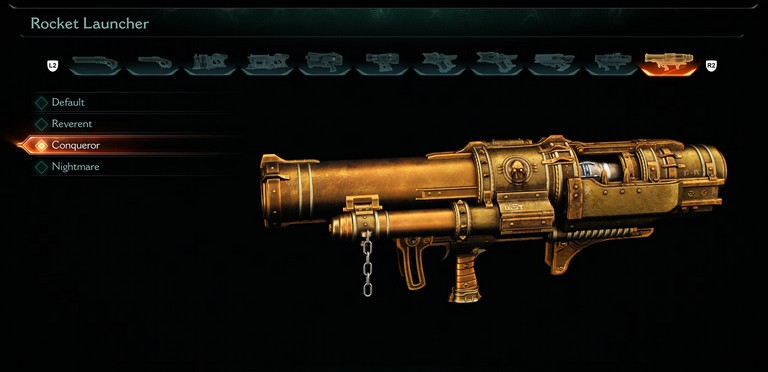
Designed for delivering high-impact explosive damage, making it effective against both individual demons and groups. It launches rockets that detonate upon impact, causing area-of-effect damage.
The rocket launcher weapon has considerable power. However, its effectiveness depends on accurately hitting targets, which requires good timing. You will get it by following the main mission in Chapter 10 “The Forsaken Plains.”
Key Features:
- Direct Fire: Rockets travel in a straight line, allowing for precise targeting of enemies at various distances.
- Explosive Impact: Each rocket causes substantial splash damage upon detonation, affecting multiple enemies within the blast radius.
Upgrades:
- Cannibalism: Parrying a Hell Surge attack temporarily causes self-damage to heal you.
- Cooked: Parrying a Hell Surge projectile empowers your next shot, increasing its damage output.
- Blood Sacrifice: Rocket Launcher projectiles deal increased splash damage at the cost of more self-damage.
- Bloodlust: Cannibalism lasts significantly longer, extending the duration of its healing effect.
Atlan’s Shotgun (Chapter 11)
Atlan’s Shotgun (Chapter 11)
Atlan’s melee attacks are potent, but integrating the shotgun during close encounters can swiftly eliminate formidable foes. You get access to Atlan’s Shotgun in Chapter 11 “Hellbreaker.” Dodge enemy attacks to boost your shots temporarily. The shotgun requires close range for maximum impact.
Key Features:
- High Damage Output: The shotgun delivers powerful blasts, making it highly effective against large demons and fortified structures.
- Close-Range Efficiency: Optimized for short-range combat, it excels in scenarios where the Atlan engages enemies up close.
Ravager (Chapter 12)
The Ravager is a formidable weapon belonging to the Skullcrusher class, designed for sustained, high-impact damage against single targets. The Ravager functions by shredding skulls to release bone shards in a concentrated spread, with its firing rate increasing the longer the trigger is held.
The Ravager can be found during Chapter 12: Sentinel Command Station. Players will locate the weapon pod containing the Ravager near a console as they proceed through the mission. You face waves of enemies in this mission make it ideal to test your new weapon.
Key Features:
- Ramp-Up Fire Rate: The weapon’s rate of fire accelerates the longer it is fired, allowing for increased damage output over sustained periods.
- Movement Penalty: While firing, the Doom Slayer’s movement speed is reduced, necessitating strategic positioning during combat.
Upgrades:
- Vampirism: While at maximum fire rate, demons damaged by the Ravager drop health pickups.
- Ignition: The Ravager reaches maximum fire rate more quickly, and the movement penalty while firing is removed.
- Slow Burn: Increases the Ravager’s maximum rate of fire but takes longer to achieve, with a more significant movement penalty while firing.
- Supplier: Demons damaged by the Ravager drop Skullcrusher ammo.
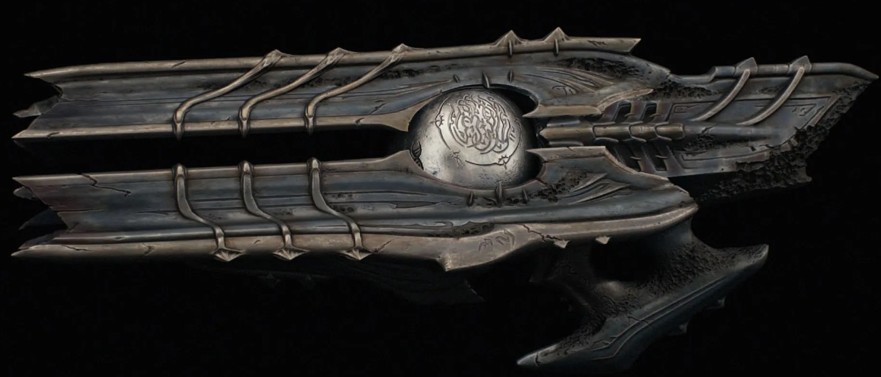
Ballistic Force Crossbow (Chapter 14)

In Doom: The Dark Ages, the Ballistic Force Crossbow (BFC) is a powerful weapon similar to the classic BFG. It fires Eldritch Lances that deal massive area damage. It is ideal for groups of demons and tough enemies. Players obtain it in Chapter 14: Spire of Nerathul while awakening The Old One, after which it becomes a permanent part of their arsenal.
You can only carry three arrows at a time and won’t recover them from defeated enemies. You’ll need to find arrows hidden in each chapter’s secrets on the maps.
Key Features:
- High Damage Output: The BFC’s Eldritch Lances can eliminate multiple enemies within its blast radius, making it ideal for crowd control and dealing with powerful foes.
- Ammunition: Players can carry up to three bolts initially, with the capacity increasing to four later in the game.
- Two-Handed Operation: Equipping the BFC requires both hands, preventing the use of a shield for blocking or parrying while the weapon is in use.
Dreadmace (Chapter 15)
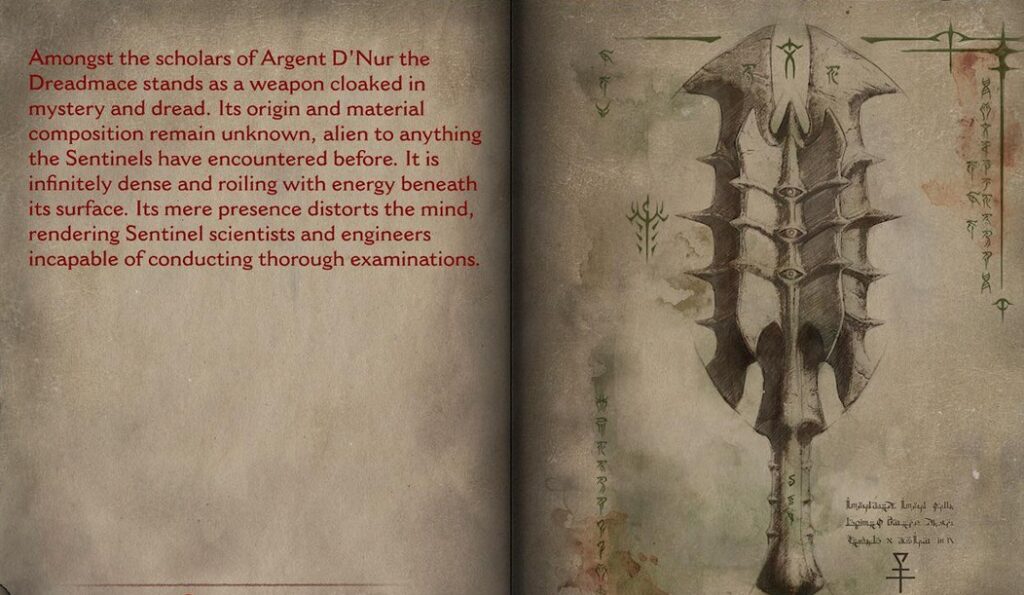
The Dreadmace stands out as an incredible melee weapon. It delivers devastating damage to both primary targets and surrounding enemies. Upon a successful hit, it replenishes all of the player’s ammunition, which is useful during combat situations. However, the Dreadmace has only one charge and a longer recharge time compared to other melee weapons. Players can reduce their recharge time by successfully parrying Hell Surge attacks.
The Dreadmace is obtained during Chapter 15: City of Ry’uul. Players acquire it by following the main quest objectives, specifically during the task to activate a portal. It is located along the primary path and is almost impossible to miss.
Key Features:
- Single Charge: The Dreadmace holds only one charge, requiring strategic use during combat.
- Area Damage: Delivers significant damage to the main target and nearby enemies, effective for crowd control.
- Ammo Replenishment: A successful strike fully restores all gun ammunition, providing a critical advantage when resources are low.
Upgrades:
- Reaper: Demons killed with the Dreadmace drop additional health pickups.
- Obliterator: Increases damage dealt to nearby demons upon a successful strike.
- Riposte: Successfully parrying a Hell Surge attack when the Dreadmace is charged grants an additional Dreadmace attack for a limited time. This bonus cannot be triggered again for a short duration.
Doom: The Dark Ages All Weapons
- Combat Shotgun (Chapter 1)
- Power Gauntlet (Chapter 1)
- Shredder (Chapter 1)
- Shield Saw (Chapter 2)
- Accelerator (Chapter 2)
- Machine Gun, for Atlan (Chapter 3)
- Pulverizer (Chapter 4)
- Impaler (Chapter 4)
- Cycler (Chapter 5)
- Super Shotgun (Chapter 5)
- Flail (Chapter 6)
- Chainshot (Chapter 6)
- Grenade Launcher (Chapter 8)
- Rocket Launcher (Chapter 10)
- Shotgun, for Atlan (Chapter 11)
- Ravager (Chapter 12)
- Ballistic Force Crossbow (Chapter 14)
- Dreadmace (Chapter 15)
This concludes our guide on all weapons in Doom: The Dark Ages.